Showing posts with label flowers. Show all posts

Sunday, May 22, 2016

Ice Cubes & Flowers.

If you're like me, sometimes you may think that your drinks like water or wine can use a boost of fun and flavor to change things up a bit. I always like adding a little lemon to my water or berries to my champagne, but I wanted to try something different. During one of my many trips to Sprouts and Whole Foods, I always noticed they had edible flowers in their produce section, thought they were cute, and wondered what I could do with them. Then it came to me...ice cubes! I thought this was the perfect way to spice up my drinks, especially with summer coming up.

I bought my edible flowers in a package from Sprouts in the produce section. The package included a mix of flowers that are currently in season including Marigolds, Snapdragons, and Dahlias.


I have this really awesome ice tray that makes ice cubes in the shape of diamonds, which I used to make my ice cubes. As a woman in the gold and diamond industry, I HAD to have this! I bought mine for a steal at Burlington Coat Factory, but you can get one online on Amazon here.


Normally when making ice cubes, the cubes come out all cloudy, but I didn't want that cloudiness to take over the pretty colors of the flowers. To fix this, I boiled the water I was going to use for the cubes twice to get rid of the minerals in the water that cause the cloudiness. While I waited for the water to cool down a bit after boiling, I arranged 2-3 flowers in the ice cube tray in an aesthetically pleasing way. Once the water cooled down, I poured it into the ice tray. I let it sit overnight, but if you're impatient, you can have them ready sooner. Just allow up to 6 hours for the water to set.


They come out looking so pretty! The flowers are a really easy way to flavor your drinks and healthy (depending on what drink you put it in ;)). You could put it in water or lemonade, but I decided to put it in Prosecco! I know what you're thinking...maybe the ice waters down the Prosecco...but actually the cubes are so small that when it melts it's not a whole lot of water and either way, its flavored by the flowers.


This was a fun way to change things up with how I drink...both visually and through taste. Next time, I think I'll try to infuse my ice cubes with some summer berries!

Tuesday, February 17, 2015

Valentine's Day.

Valentine's Day is one of my favorite days of the year. I've always loved this day, even when I was single, because personally, I think its a day to show your love to all your loved ones, not just your significant other. I always made treats and exchanged Valentines with my closest girl friends.

I started preparing for the fun of Valentine's Day this year with a cute heart manicure. On gray nails, I just used a toothpick to drop two droplets of red nail polish on my nail and dragged them diagonally to connect them and form a heart.


This year, trying to avoid the dinner crowd and boring prixe fix menus, my boyfriend decided to make me dinner at his house. I decided to make the dessert to finish off our dinner. I took a small shortcut by buying this yummy chai tea latte cake mix from Target. It tastes so authentic and has little cinnamon chips incorporated in the batter to give it something special. It also includes mix for the vanilla frosting.


I added my own touch by baking them in Valentine inspired cupcake papers, sprinkling on heart shaped sprinkles, and creating chocolate garnishes to top them off. To create the garnishes, I melted milk chocolate in the microwave in a squirt bottle, mixing the chocolate every 30 seconds. Then using the squirt bottle, I piped different shapes the and word "Love" on wax paper and let it cool in the fridge for about 30 minutes. They slide right off the wax paper and can be secured on the cupcake with the frosting.


Even though our dinner was at home, I still wanted to doll up for the evening and I picked a special outfit for the occasion...red being the theme of the day and all!

Top: Zara
Skirt: H&M
Shoes: Steve Madden
Jewlery: Levik's Jewelers and Swarovski

I picked out the perfect card too...Target is my go to store for any holiday.


Now for our dinner...I'm so happy to say that my boyfriend actually used one of my blog recipes, Pesto Linguini for one of our dishes. See fellas? You too can impress your girls with my recipes! He also added his own steak recipe to the menu, which was delicious. Food is great, but the presentation of the table was even more great.


Chef Seto.


Folks, this just goes to show that Valentine's Day doesn't have to be a day of emptying your wallets. A personal touch and handmade food/gifts can make your night special and meaningful. I hope everyone had a great Valentine's Day whether or not you are with someone special. Valentine's Day is about love, and everyone can experience that. 

Monday, August 11, 2014

Throwing a Fab Dinner Party.

Last weekend, I decided to throw a dinner party for my girlfriends at my house. I've watch tons and tons of Barefoot Contessa episodes...enough that I've learned a few tips and created some of my own for creating the perfect dinner party. I really love cooking and I love entertaining, so this was a fun experience for me. Here's what it takes to throw a great dinner party...

Table Setting:

Use a fun tablecloth and pair with napkins in a similar a color palette. The color blue is psychologically an appetite opener, so its helpful to use. Serving food in white serving dishes are classy and a good way to make your food the star of the table rather than a fancy plate.

Flowers are a great centerpiece to bring the table together. It's great to use bright colored flowers that pop in contrast with the tablecloth, napkins, and plates. Make sure the flowers aren't too tall. I like to test this by sitting in front of the flowers and making sure the flowers are not in my field of vision when I look across the table.

Candles are also a great addition to your table. Make sure, again that they are not too tall. Most importantly, make sure they are NOT scented! You don't want a candle scent to overpower the smell of your delicious food.

I used a blue color palette and added a pop of color with bright yellow sunflowers. 


Drinks:

I like to have both red and white wine available for my guests. Have enough bottles for the amount of guests you will have...about 1 bottle per 4 people.

I also have some hard liquor and a couple juices or sodas to mix it with.

Finally, I fill a pitcher with water and add some lemons to place on the table.

Toasting to my girls. 


Dinner:

Start with a good appetizers. Depending on the amount of guests, have a couple of options. Since I only had 3 guests, I made a cheese plate. I placed brie, gouda, and gruyere cheese on lemon leaves and added some toasted french bread with red grapes and almonds.


Everyone's tastes are different, but what I like to do is have 5 parts to a meal:

  1. Start with a salad with a light dressing. 
  2. I like to include some type of bread like rolls or garlic bread. 
  3. Then for the main course, I like to make 1 protein dish like marinated chicken, steak, or fish. 
  4. Then I have 1 carbohydrate side dish like mashed potatoes or a simple pasta. 
  5. Then I have a MUST of a vegetable(s) like brussel sprouts or broccolini. 


For my dinner party, I began with a light Greek salad with lemon and olive oil and made some garlic Parmesan bread. I made grilled chicken marinated in lemon, garlic, rosemary, sage, and olive oil. I paired it with roasted rosemary potatoes and roasted asparagus.


Dessert:

When the meal is done, I like to serve dessert with tea and coffee.

I like to have fresh fruit as a dessert option for those who prefer healthy alternatives.

Desserts are what guests bring as a gift to a dinner party most of the time, so serving their gifted dessert is a must.

Depending on the amount of work you do to prepare for dinner, I like to keep this part light and simple. I cheat and just arrange store bought cookies or buy a pie or cake. If the rest of the dinner I make is easy and less time consuming, I'll try to bake a dessert.


And that's it! A fun and easy way to entertain and throw a great dinner party. Getting compliments about it all is the best part ;)

Wednesday, July 31, 2013

Bouquets of Bacon!

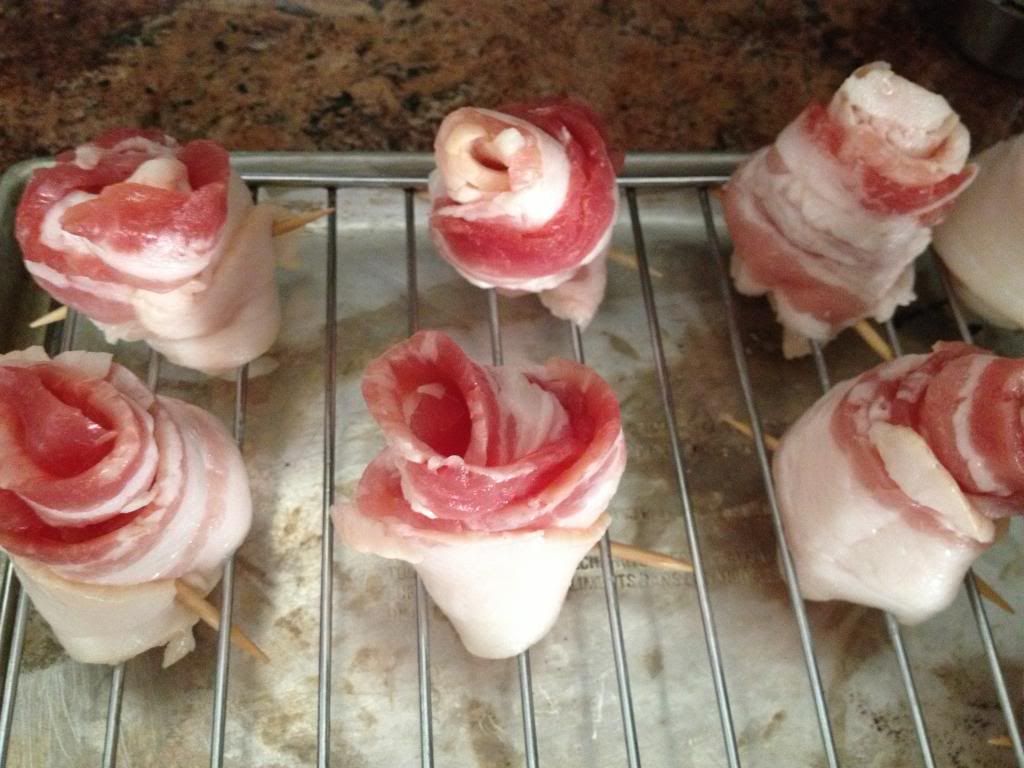
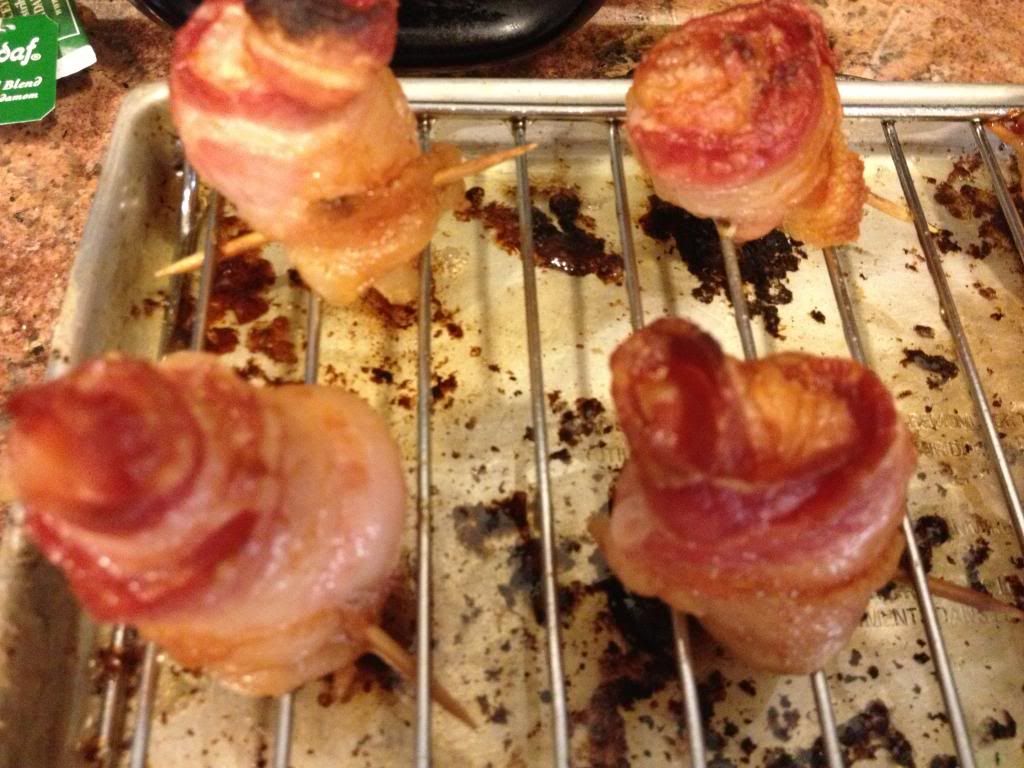
Girls love getting big bouquets of roses...and what do guys love? Bacon roses! Come to think of it, everyone loves bacon, so everyone should love these treats that are both appealing to the eyes and to the taste buds. These turned out pretty awesome, if I do say so myself...

Roll and pop in the oven.

Crisp and tasty.

Add bacon to artificial bouquet.


Voila! 

Monday, April 8, 2013

Easter and Such

Lacking some serious void from my artsy side, I decided to put a little creative spin on Easter dinner this year. Armenians usually have a prix fixe Easter dinner menu of salty fish and a sort of spinach frittata, so I took a different route...


I took my dad's retro 90's ties and used them to paint our Easter eggs! (instructions at end of post)

Our dinner table, decked out with springtime accessories

And to finish, mini cheesecake bites for dessert (recipe at end of post)


"Tie"-dyed Easter Eggs:

What you will need:
  • Old silk ties or other old silk clothing (make sure they are silk, otherwise the eggs won't hold the colors!)
  • An old white t-shirt or cotton fabric
  • Eggs
  • Rubber bands
  • Water
  • White vinegar


1. Cut the silk fabric into 3inch x 3inch squares

2. Then cut the white cotton fabric into 3inch x 3inch squares

3. Wrap the eggs first in the silk fabric, then the white cotton fabric. Secure with rubber bands. You can wrap raw eggs, but I boiled mine before wrapping

4. In a pot on medium heat, add 3 tablespoons of white vinegar to water (enough water to submerge the eggs entirely)

5. Let the eggs heat on medium for 25-30 minutes

6. Remove the eggs from the boiling water and let sit until dried. Then remove the rubber bands and fabric.
VOILA!


Mini Cheesecake Bites:

Ingredients:
  • 2 8 ounce packages of low fat cream cheese, softened to room temperature (this is imperative!)
  • 3/4 cups sugar
  • 3 eggs
  • 1 tsp vanilla
  • 1tbsp lemon juice
  • Dash of lemon zest
  • Mini Nilla wafers (make sure they are the regular kind, not the low fat ones otherwise it will float to the top of the cheesecake)
  • Fruit or fruit compote of your choice to garnish
1. Make sure the cream cheese is softened to room temperature, otherwise the cakes will come out clumpy! You can microwave the cheese for 10 seconds if you are in a hurry

2. Mix together cream cheese, sugar, eggs, vanilla, lemon juice and lemon zest until smooth

3. Line up mini baking cups and place a mini Nilla Wager face up inside each one

4. Scoop mixture into wafer, filling cup 3/4 full

5. Bake at 350 degrees for 20 minutes

6. Refrigerate. Once chilled, garnish fruit atop each mini cheesecake. Chill again